Versions Compared

Key

  • This line was added.
  • This line was removed.
  • Formatting was changed.


Resumen


Excerpt

Aquí aprenderás cómo crear órdenes futuras para sus clientes. Las órdenes futuras se basan en productos comprados en POs no asociados a Preventas o a través de Preventas. Here, you will learn how to create future sales orders for customers. Future Sales orders are based on products that were bought through a Future Sales Standalone PO or throughout a Prebook (with Future Sales customer too) that has been confirmed by the Vendor. For more information refer to: Setting and Creating Future Sales.

The sales team can begin by making orders for customers following the steps below:

Instructions

Aquí, aprenderás cómo crear órdenes futuras para los clientes. Las órdenes futuras se basan en los productos comprados en POs independientes o a través de Preventas (con cliente Future Sales) que se ha confirmado por el proveedor.


Instrucciones

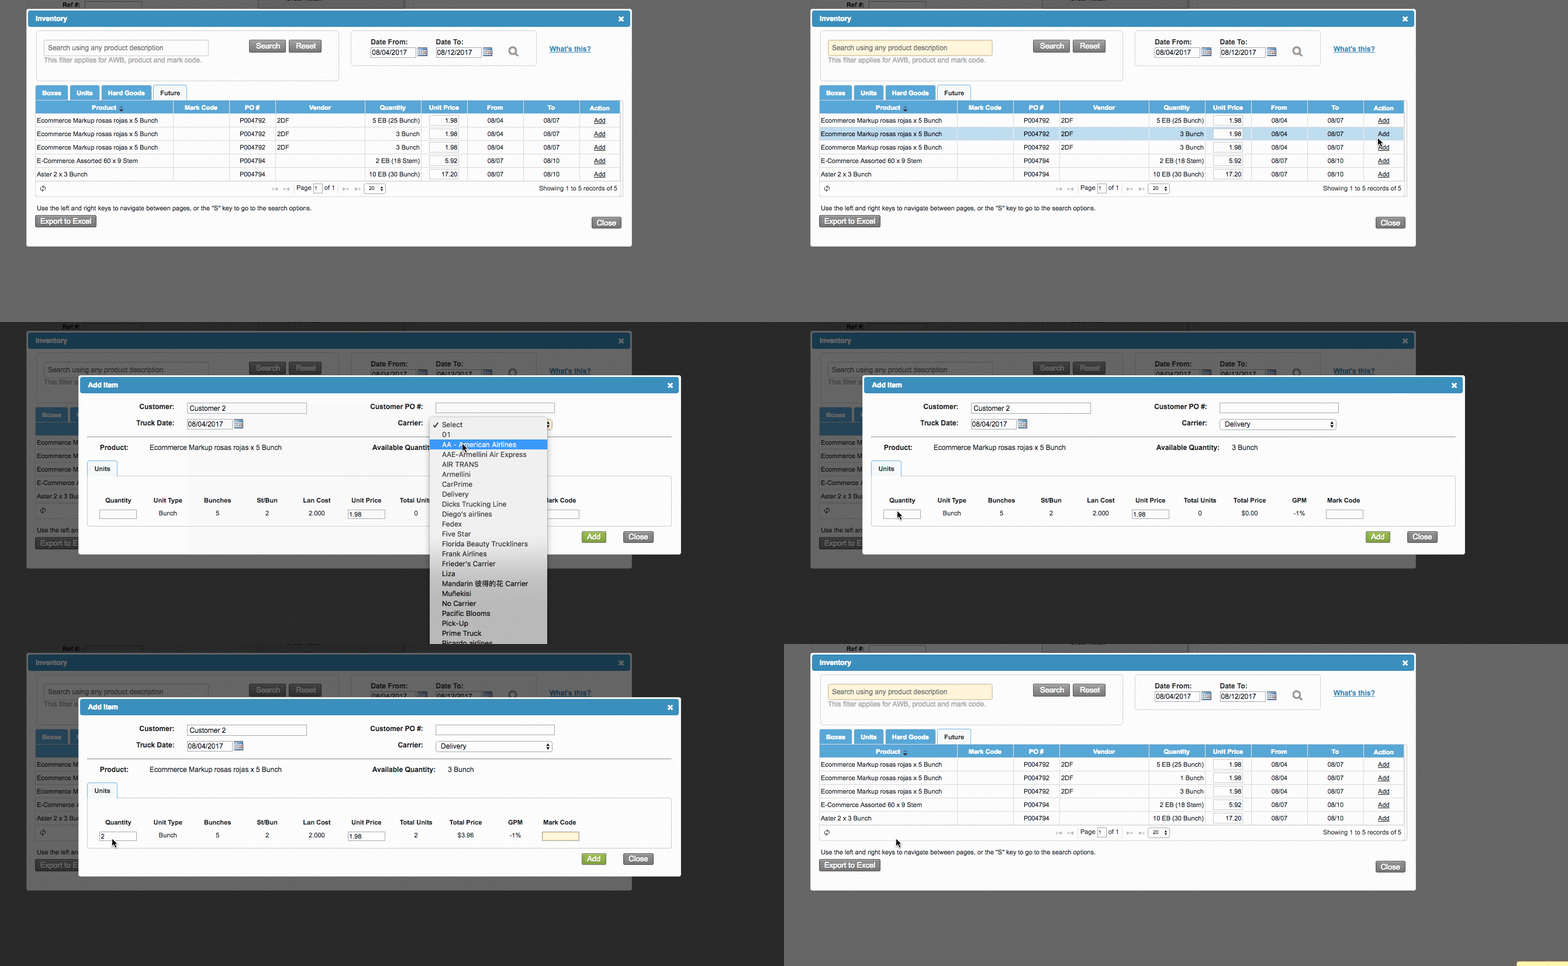
The Add Item window will pop-up. Notice that users can add products both in units or boxes (if the  is enabled). Select the Truck Date, the number of boxes or units, click on the Add Ship To link, add the Mark Code if needed, and then click on the green "Add" button. If the is disabled and the user is able to see sensitive data, the system will display the aging of the product by the time of the ship date of the order to the final customer. Salesperson should consider this for placing Future Sales orders.
Ui steps
sizesmall


Ui step

Go to Order Entry > Add Order, fill in the information requested, and click on "Add Items"Ir a Ventas>>Agregar Orden llenar la información requerida y hacer clic en Agregar Productos.


Ui step

In order to see the future inventory, click on the "Future" tab. This screen will allow the user to review and correct the prices for future inventory. Use the "Unit Price" field to edit the prices if needed. The user can also navigate within this column by using the up and down arrow keys on the keyboard. Notice there is a shortcut filter by date.

Ui step

Add the items by clicking on the Add option located under the "Action" column. Double-clicking on the line will also work. 

Ui step
Ui step

Once the items have been added, the system will automatically create the Prebook. A message with the Prebook number will pop-up on the lower right side of the screen. 

Ui step

 After the Prebook is generated and the Purchase Order processed and the goods have arrived at the warehouse. The warehouse should proceed to ship on the date specified within the Prebook. Once the goods are confirmed as received in the inventory, the invoice order can be created. Para ver el inventario futuro, hacer clic en la pestaña "Futuro". Esta pantalla permitirá al usuario revisar y corregir los precios del inventario futuro. Usar el campo "Precio Unitario" para editar los precios requeridos. El usuario también puede navegar dentro de esta columna usando las flechas arriba y abajo del teclado. Observe que hay un filtro por fecha.


Ui step

Agregar los productos haciendo clic en Agregar bajo la columna de Acciones. Al hacer doble clic en la línea también funcionará.


Ui step

La ventana de Agregar Producto se abrirá. Si la opción de ventas por unidades está habilitada, los usuarios podrán agregar productos en cajas o unidades. Seleccionar la fecha de despacho, el número de cajas o unidades, agregar marcación especial lugar alterno de despacho si es necesario y hacer clic en el botón de agregar.


Ui step

Una vez los productos se han añadido, el sistema creará automáticamente la Preventa. Aparecerá un mensaje con el número de la Preventa en la parte inferior derecha de la pantalla.


Ui step

Una vez los productos lleguen a la bodega, el equipo de bodega debería proceder a enviar los productos en la fecha especificada en la Preventa, Una vez se confirman los productos como recibidos en el inventario, la factura podrá crearse.


Notice that if the setting Inventory Rotation is disabled and the customer is allowed to see the sensitive information, the aging of the product will vary, depending on the Ship Date of the order
Info
titleAging of Future Sales Products
Edad de Productos de Ventas Futuras

Observe que si la opción de rotación de inventario está deshabilitada y el cliente puede ver información sensible, la edad del producto variará, dependiendo de la fecha de despacho de la orden.


Panel
titleRelated ArticlesArtículos Relacionados

Filter by label (Content by label)
showLabelsfalse
max10
showSpacefalse
sorttitle
cqllabel = "order-entry"in ("ventas","resumen-órdenes","órdenes-futuras")
labelsorder-entry


When the system Sell By Units is enabled, you will be able to add items to an order in boxes and units. If the content within a box is partially sold, the remaining units will be available to be sold as units. This will happen if the setting Bill Units as Boxes is disabled. Click on the GIF to see the details
Tip
titleFuture Sales Order in Units
Orden en Unidades

Cuando la opción de ventas por unidades está habilitada, podrá agregar productos a la orden en cajas y unidades. Si el contenido dentro de la caja es vendido parcialmente, las unidades restantes estarán disponibles para venderse como unidades. Esto pasará siempre que la opción de facturar unidades como cajas esté deshabilitada.