Versions Compared

Key

  • This line was added.
  • This line was removed.
  • Formatting was changed.

Overview


Excerpt

Prebooks can be created from Vendor Availability inventory.  T


Ui text box
sizemedium

(lightbulb) Roles enabled to perform this action: Only users with Admin, Sales and Sales Manager roles can view the vendor availability when creating Prebooks.


Main Actions


Ui expand
titleCreating Prebooks With Products From Vendor Availability


Once the Vendor Availability is uploaded and the Customer Product Packs per customer are set (if applicable) items from vendor availability can be added to new or existing Prebooks. In order to do this:


Ui steps
sizesmall


Ui step

Go to Prebooks and SO's, if there is an existing Prebook that will be edited, click on Prebook Summary, find the Prebook by entering the number and hit enter.


Ui step

 Once the Prebook is found go to the Actions column and click on Edit.


Ui step

 If a new Prebook is going to be created click on Add Prebook enter the details of the Prebook and follow the steps below.


Ui step

 Once the user selects Edit for existing Prebooks or enters the Add Prebook screen, the system will show the Add Future or Add Items from Vendor Availability link, click on it to open the Vendor Product Availability screen.


Ui step

 The product availability screen will display everything that was uploaded from the vendor's CSV file, confirmed in the vendor availability staging area and any products matching the search criteria.


Ui step

To add the product to the Prebook there are two options: 

  • The first option is entering the information into the blank fields with the keyboard and hitting the enter key at the end to finish or by clicking on the Add link. The system will automatically convert the units into boxes using the default product packs that are set by the vendor. Additionally, the system will suggest the number of available boxes based on the product packs.


  • The second option is by going under the Actions column and clicking on View, and entering the information in the popup window.


Info
iconfalse
titleCustom Fields

During this process, you can add custom fields to product lines which will remain the same when creating the PO. Just click on the Gear Icon in the Actions column.

Image Modified


Ui step

Once the window pops up, select the product and fill in the rest of the information. Here, the system will show the number of available units for that product, once done click on the green Add button.


If the product doesn't exist within the account, the product must be added from the Setup.

The image above shows the following information:

  • Product Description: the product name as it appears on the CSV file.
  • Vendor Name: the name of the vendor the product comes from.
  • Available Units: the total amount of units available for any salesperson to add to any Prebook.


Ui step

 Using either option to add the product, the user will see the product aging and will be able to filter it to sell the older product first. Also, the user has the option to filter by Post Harvest information and the Stems/Bunch number.

The Aging filter is optional for those companies that need to search using this information.


Ui step

 Once a product from Vendor Availability is added, the system will show that line highlighted in the inventory for that particular Prebook.


Ui step

Once the line is added, the system will take the user back to the Vendor Availability screen.


Important

The system will take into account if the Prebook is shipped via Warehouse or Grower when it is created using the Vendor Availability.

If the order is shipped via Grower, the date for the Prebook must be the same as the Available From date, from the Vendor Availability. This applies when creating a Prebook, using Single or Mixed Boxes and when a Prebook is generated from a Standing Order, automatic or manual process.


Ui expand
titleAdding Mixed Boxes From Vendor Availability

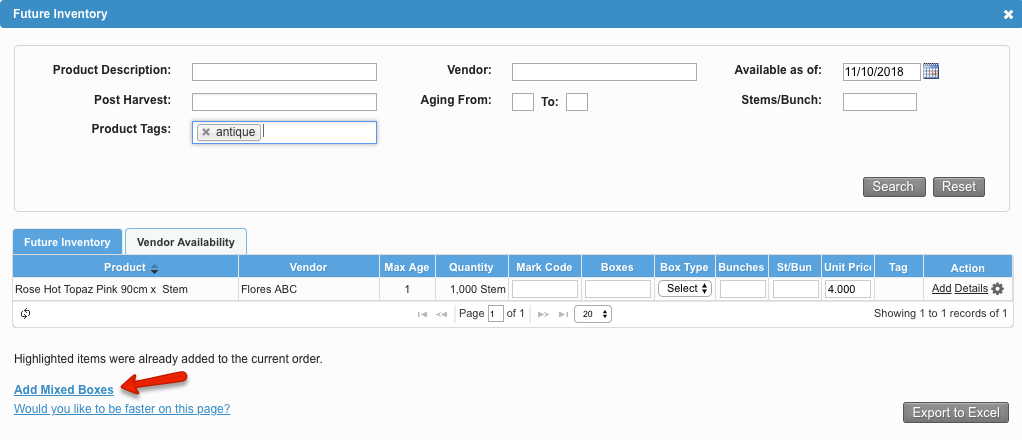
To add Mixed Boxes from Vendor Availability, just follow the steps below:

Ui steps
sizesmall


Ui step

After clicking on Add Items from Vendor Availability, click on Add Mixed Boxes.


Ui step

 A new window will pop up, type in the Item information and the breakdown Information for the mixed boxes. On the Product field, type in the first three letters of the product requested. Select the product needed from the drop-down list.


Ui step

 When entering the breakdown information, the user will have a consolidated view of the products by Variety, Category, Color, Grade and Aging. The user will easily find the product needed in a faster and simple way by clicking on any of the filters mentioned.

The Aging will appear if the company has this setting activated. To have this option activated contact Komet Sales Support.


Ui step

The user can add items of the breakdown faster by using the Keyboard Shortcuts


Ui step

After adding the breakdown information, items that were added will be highlighted and will appear on the right-hand side. Here, the user can delete the breakdown from the Actions column if needed.


Ui step

 Click on Save to finish.


Ui step

 If you want to create a new mixed box, just click on the New Box gray button (or press the keyboard shortcut Ctrl+M).


Ui expand
titleEditing an Assorted Item From Vendor Availability

To edit an assorted item from Vendor Availability, follow the steps below:

Ui steps
sizesmall


Ui step

Go to "Prebook & SO's" > "Prebook Summary" > Use the filters to find the Prebook that needs to be edited. 


Ui step

Go to "Actions" column > Click on "Edit".


Ui step

Look for the PO item you are searching for.


Ui step

Go to the Actions column and click on Edit.


Ui step

After clicking on "Edit" the system will display the Mixed Boxes window to edit the item information. Once the user finishes, click on "Save".


The system only allows users to edit the items from Vendor availability before the Purchase Order is confirmed. After a Purchase Order is confirmed the system will not display the option to edit.


Ui expand
titleAdding notes to Prebooks items coming from Vendor Availability

The system allows to add notes while adding products from Vendor Availability. To do this, click on Details for a product line, from the Vendor Availability tab (or type Ctrl + d with the cursor over the product line). The Add Item window will pop up. Type general notes or vendor notes and click con Add (For more information about it read Prebook Notes). The notes added will be reflected on the PO once it is created.


Panel
titleRelated Articles

Filter by label (Content by label)
showLabelsfalse
max10
showSpacefalse
sorttitle
cqllabel in ( "vendor-availability" , "create-prebook" , "prebook-vendor-availability" , "shorcuts" , "mixed-boxes-prebooks" , "prebooks" )
labelsPrebooks, vendor-availability prebook-vendor-availability create-prebook shorcuts mixed-boxes-prebooks


Tip
titleTip: Product Tags & Shortcuts

1) Use Product Tags filter to search for the available items easier (click on the image to see the detail). This filter is also available in the Add Mixed Boxes window.

2) The system has several keyboard shortcuts available from this window, please read Vendor Availability - Keyboard Shortcuts for more information.


...