Versions Compared

Key

  • This line was added.
  • This line was removed.
  • Formatting was changed.

Overview


Excerpt

Komet allows its users to invoice units once a box has been opened. The Sell By Units Setting must be enabled.


The unit price settings behavior is set from the Sell By Units Setting option, under Settings for Order Entry. Units can be invoiced manually or using the scanner.


Ui expand
titleTo Manually Invoice Units


Ui steps
sizesmall


Ui step

Go to Order Entry > Add Order select the customer, date, carrier, customer PO, and reference number (if applicable).


Ui step

 Save the information and start adding items by clicking on the "Add Items" green button.


Ui step

Once you click on Add Item, the Inventory window will pop-up. Go to the "Units" tab, enter the number of bunches or stems to be sold under "Quantity to Sell", and hit Enter (a yellow message will pop-up stating "Items added successfully").


Info
titleInformation

When the unit type is stem, the system will only allow to enter multiples of the packaging (Stems/Bunch)  within the quantity to sell field:


Ui step

Alternatively, you can also add products by double-clicking anywhere on the product line item needed to be added and a window will pop-up, here you can enter the number of bunches or stems, price, and mark code; when done click on the Add button.


Image Modified


Ui expand
titleTo Invoice Units by Scanning

Instructions

Ui steps
sizesmall


Ui step

Click on the "Scan bunches" button at the top right-hand corner of the "Inventory" window.


Ui step

 Enter the UPC code and press enter or scan the label as needed.


Ui step

 Once done adding items by units to the invoice, close the Inventory window to view the invoice details.


Ui step

This screen has two different sections: Boxes and Units. If the invoice has items sold by boxes, they will be displayed separately from the items sold by units. Each section will have its own totals, but the "Order Total" will be displayed below the invoice number.


Ui step

In case an item from the units section needs to be deleted, it can be done by either scanning the label or using the delete function under the "Actions" column.

Image Modified


Ui expand
titleHow to Edit Quantities, Prices and Mark Code

Notice that the system allows changing the product price and quantity of the products added using the Tab and the enter keys directly from the grid. You can also go to the Actions column and click on Edit in order to modify more details.


Ui expand
titleHow to Print an Invoice with Products in Units

Instructions

Ui steps
sizesmall


Ui step

Once the invoice is created, click on the Print gray button


Ui step

 A confirmation window will appear where you can select the type of document you want to print, select invoice and click on Print.


Ui step

Once you click on Print, the system will download a PDF file. Download here an example.

Image Modified


Info
titleInformation: Mark Code on Invoices

The mark code will appear con invoices, even if it has been associated during the Prebook creation, and the invoice is created through Automatic Billing, Allocations or Fill From Open Market options, separating the items according to the mark code and will be listed alphabetically.

Image Modified


Ui expand
titleHow to Apply a Discount per Line

The system allows you to set discounts for the whole order. However, If you want to make exceptions for a given line, you will be able to do it from the Add Order screen while adding or editing a product line.

Warning
titleImportant

You must first set the discount for the entire order and then, set the discount per line. If you set a discount for a given line before setting the order discount (the discount for the entire order), the discount per line will be omitted.


Instructions

Ui steps
sizesmall


Ui step

Enable the option Allow to set discount per line.


Ui step

Go to Order Entry>>Add Order.


Ui step

Enter the invoice information and apply the discount to the order. Click on Add Items


Ui step

 Click on the Units tab and add the lines to the invoice.


Ui step

You will be able to set a discount by double clicking on the product line while adding the items or just proceed to add the item and then apply the discount directly from the invoice line added.


Ui step

 Notice that the discount set for a given line will override the discount applied to the whole order.


Ui expand
titleHow to Send a Product Image by Email

The system allows users to send product images by email while invoicing items.

Instructions

Ui steps
sizesmall


Ui step

From the Add Order>>Inventory screen, double click on the name of the product for which you want to send an image.


Ui step

 The system will open a new window that will display the product image. Click on the Send via email link


Ui step

Enter the email details and click on Send to finish.


Ui expand
titleArrival Date and Aging

When a given setting is enabled, users will be able to see the arrival date and aging of products in units. By clicking on the header of the column, you will be able to sort the column in ascending order.

Image Modified


Panel
titleRelated Articles

Filter by label (Content by label)
showLabelsfalse
max10
showSpacefalse
sorttitle
cqllabel in ( "sales-by-units" , "sell-by-units" , "order-entry" , "invoice-units" )
labelssales-by-units, order-entry, sell-by-units, invoice-units


Ui text box
sizemedium

(lightbulb) Roles enabled to perform this action: Admin, Sales Manager, Cashier, Sales, Allocations.


Info
titleVendor Filter

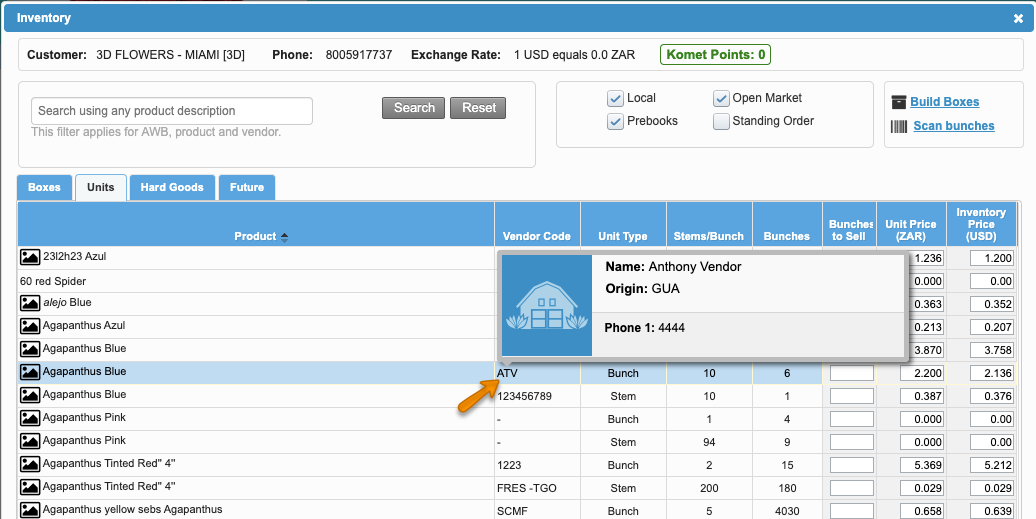
In some cases, users will be able to filter products by vendor. The Vendor column will display the vendor code, by clicking on it, the system will display more information.

Image Modified


...