Versions Compared

Key

  • This line was added.
  • This line was removed.
  • Formatting was changed.
Excerpt

In order to create shipments in Komet Sales, vendors can be required to confirm purchase orders first. Here you will learn how to do it.


Warning
titleImportant
  • Some of the companies which work with Komet Sales system use a TEST MODE. Imight be that the system sends emails asking to confirm a PO with the next message: Please note that this PO was generated in a company that is running in Test Mode. If this is the case you can ignorthe email since the PO is not real.
  • In case you have issues while confirming your POs, read Unable to Confirm a Purchase Order.


Ui expand
titleInstructions for confirming PO's from the vendor portal


Ui steps
sizesmall


Ui step

Go to www.kometsales.com and click on the Login button.


Ui step

 Enter the username and password. In case the user does not have one, contact the company in order to be provided with one.


Ui step

 If the account is associated with more than one company once the user logs in into the system they will need to click on the "Select your Company" window and select the company that they are going to work with. In case the account is linked to a single company, the option "Select your Company" will not show up.


Ui step

Go to Purchase Orders > Confirm POs which displays the list of PO's sent by the customer. Please note that the system takes the current date as default 

Searching is simple: enter any of the available search parameters and press the "Search" button.


Ui step
  • In case the vendor does not have all of the items requested, the order can be partially confirmed by entering the number of available boxes in the (To Confirm) field box and pressing enter.
  • Items coming from Vendor Availability or K2K inventories sold on e-commerce cannot be confirmed until the final customer completes the checkout process.
  • If the entire purchase order is to be confirmed just enter the total number of boxes in the order in the (To Confirm) field box and press enter.
  • Check the Status field the current status of the order: confirmed orders (Confirmed), partially confirmed orders (Partially Confirmed), waiting to be confirmed (Pending) and dispatched orders (Shipped).


Ui step

Clicking the Confirm Shipments button will simultaneously confirm all of the purchase orders that match the search previously entered. A confirmation window will open, to confirm press Yes.


Info
titleInformation

Once all PO's have been confirmed, they can be added to an AWB. Please refer to our article Creating a New AWB Shipment.


Ui expand
titleConfirm PO screen

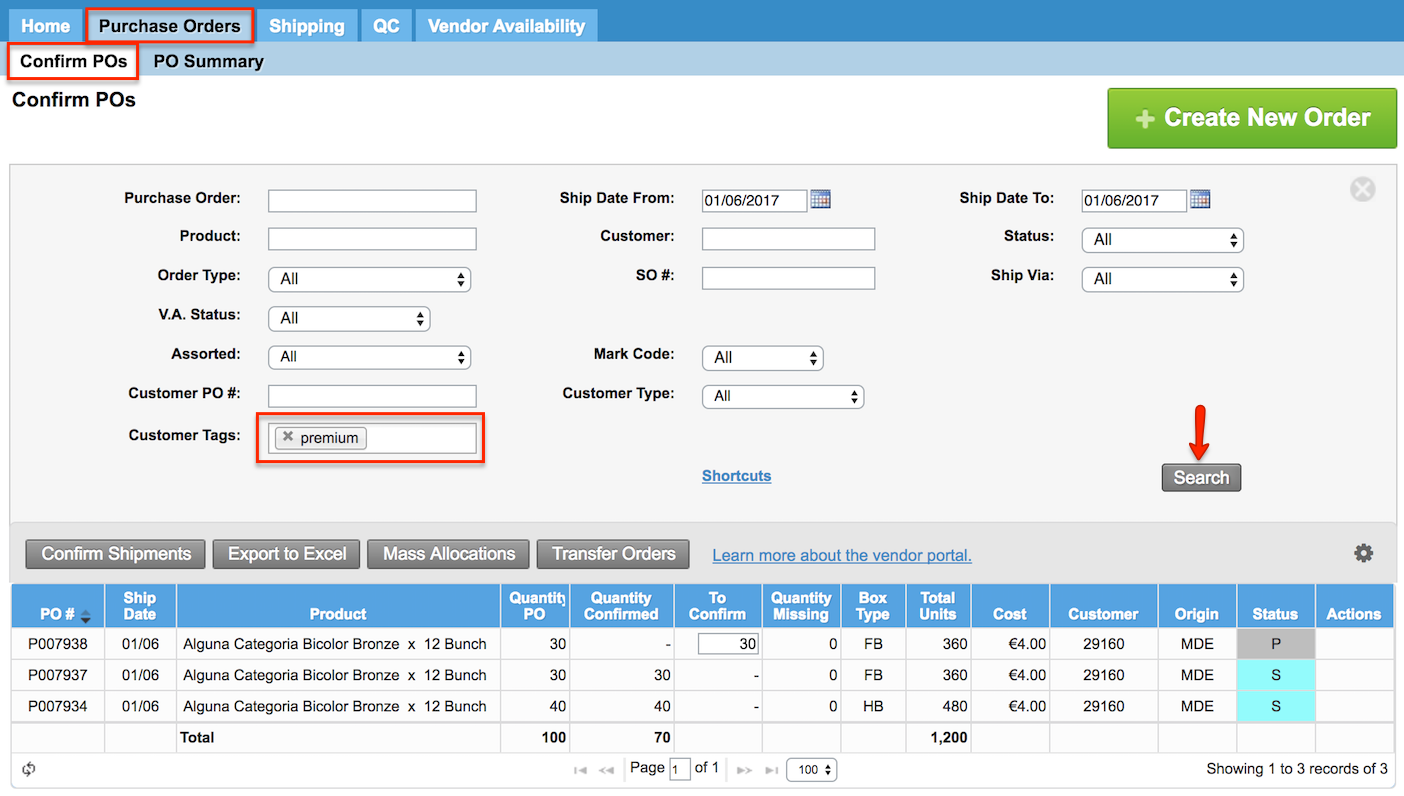
The information showed in the Confirm PO screen is customizable by clicking on the gear icon.


Each row matches a product which is linked to a Purchase Order including the following information:

  • PO #: the purchase order number.

  • Ship Date: the date when the PO needs to be shipped in MM/DD format.

  • Vendor: the vendor name.
  • Product: the product that needs to be shipped.

  • Qty PO: the number of boxes required for this product.

  • Qty Conf: the number of boxes already confirmed for this product.

  • To Conf: the number of boxes pending to be confirmed.

  • Qty Missing: the number of boxes that hasn't been confirmed (Missing).

  • The box type (B/T).

  • Total Units: the total of units to be shipped.

  • Cost: the cost per unit (displayed in the vendor's currency).

  • Total Cost: Is the product of the number of units and the cost per unit (displayed in the vendor's currency).

  • Customer: the customer's name.

  • Mark code: Is a code associated with some marks.

  • Origin: the port where the product comes.

  • Status: the PO status 

  • Customer PO #: The customer PO # of the prebook
  • Actions: Action to be performed with the shipment.


V.A. Status: the status of the PO when allocating using vendor availability items. There are three statuses: Allocated, Not Allocated and All. The system will display a V in blue next to the PO number if the product was 100 % allocated from vendor availability. When passing the cursor key over the blue V, the system will show the information about the product that was allocated. Remember this information will only appear in those accounts with the Vendor Availability option active.

Image Modified


Ui expand
titleProduct Recipes

A recipe is a bunch consisting of different varieties of flowers. Purchase Orders can be created using Recipes and they will be identified with a blue star icon. You can postpone or substitute PO items that have recipes. To see the PO details click on the blue star icon next to the Recipe name.

Once you click on the star, the Recipe details window will appear:


Ui expand
titleUploading Invoices

To upload invoices for each PO, go to the PO Summary tab and click on "Upload" and Save. For more information refer to our article: Upload invoices to Komet Sales.


Ui expand
titleConfirming PO's by email


Info
You can confirm a PO directly from your email or just confirm that you have received the purchase order. For further information please read Email Notification for Cancelled and Partially Confirmed POs.


Panel
titleRelated Articles

Filter by label (Content by label)
showLabelsfalse
max10
showSpacefalse
cqllabel in ( "vendor-portal" , "confirm-po" )
labelsvendor-portal


Info
titleInformation

When vendors create POs, these are automatically approved please read Allow Vendors to create Purchase Orders for further information.


Tip
titleTip: Products and Customers Tags

Sometimes the company categorizes the customers with tags (by priority, for example), or the Products. You can use these tags to quickly find the POs needed and perform actions such as Mass Allocations, Export to Excel and Confirm Shipments.


...